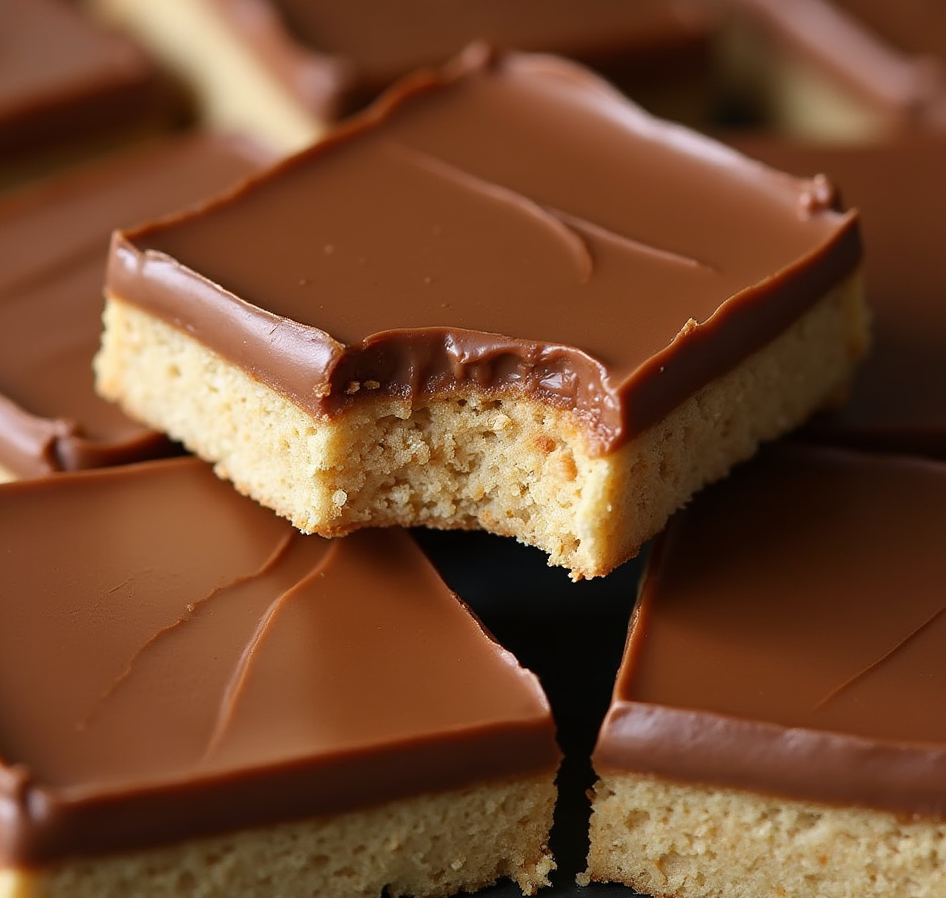
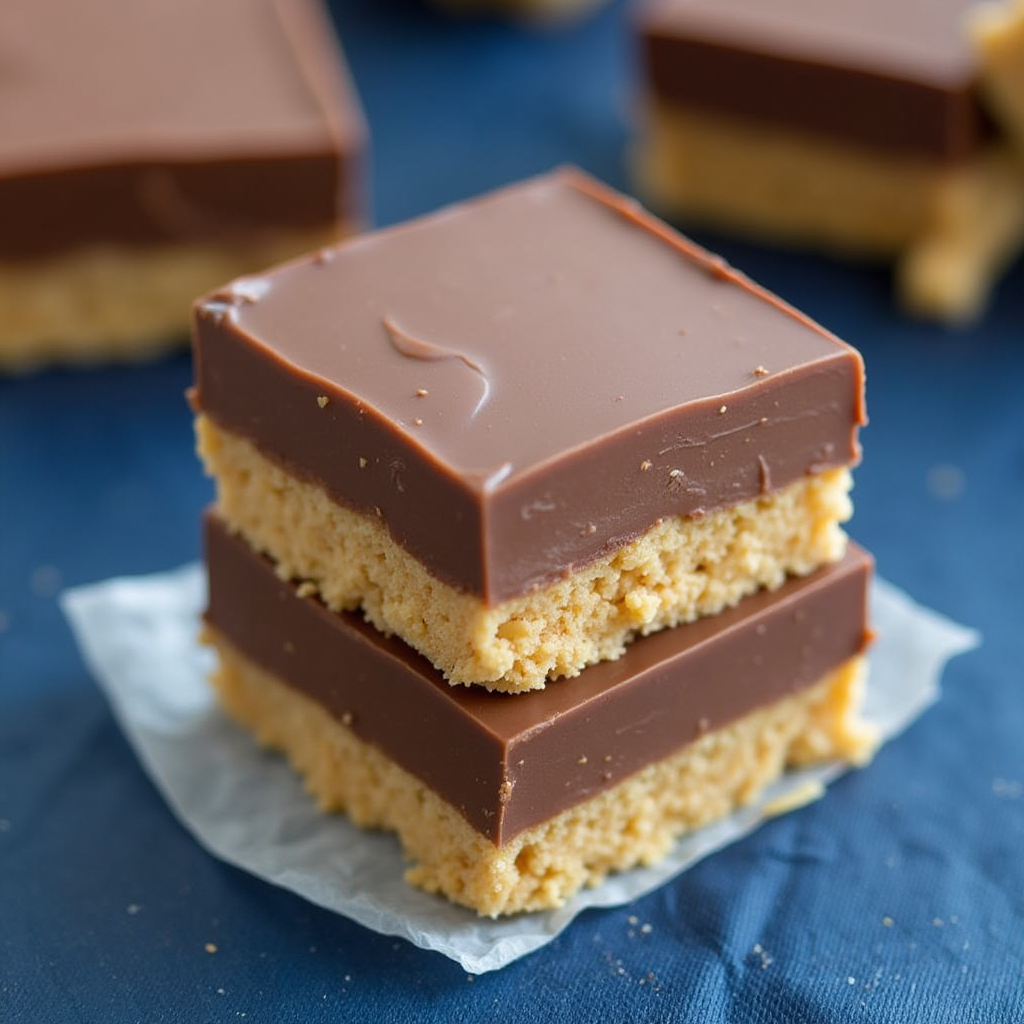
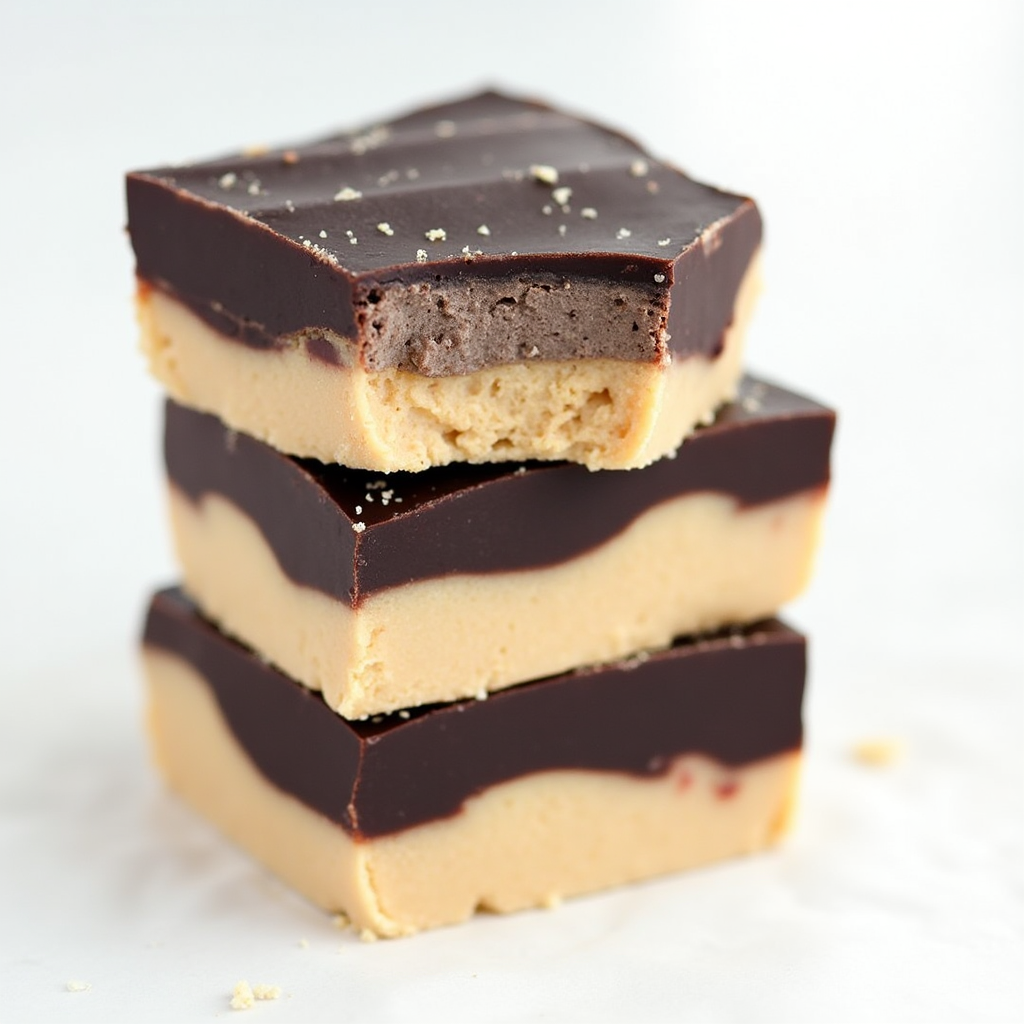
Chocolate Peanut Butter Bars are a rich, indulgent dessert that combines the smooth creaminess of peanut butter with the irresistible flavor of chocolate. Whether you’re preparing a treat for a gathering or satisfying a personal craving, this dessert offers a winning combination that delights every palate. These bars are simple to make yet offer a professional-level result, perfect for bakers of all skill levels.
This article will walk you through everything you need to know about Chocolate Peanut Butter Bars. From understanding the ingredients and tools to mastering the recipe and exploring creative variations, you’ll have all the information you need to create the perfect dessert. By following the detailed instructions and tips provided, you can achieve flawless results every time. Let’s dive into the details of this timeless dessert that has won hearts around the world.
Ingredients Overview
The ingredients for Chocolate Peanut Butter Bars are straightforward, yet each plays a crucial role in delivering the perfect taste and texture. To ensure the best results, it’s important to understand how these components work together.
Key Ingredients
- Peanut Butter: The star of the recipe, peanut butter adds a nutty, creamy richness to the bars. Opt for smooth peanut butter for a uniform texture or crunchy if you prefer added bite.
- Chocolate: High-quality chocolate ensures the topping has a velvety finish and an intense flavor. Use semi-sweet or dark chocolate depending on your preference for sweetness.
- Butter: Butter provides richness and helps bind the base together. Choose unsalted butter for better control over the salt content.
- Graham Cracker Crumbs: These crumbs create the base’s signature texture and add a subtle sweetness that complements the other ingredients.
- Powdered Sugar: Also known as confectioners’ sugar, it sweetens the bars and helps create the desired consistency.
Optional Additions
- A pinch of sea salt to balance sweetness.
- Vanilla extract for enhanced flavor depth.
- Chopped nuts or shredded coconut for texture variety.
By keeping your ingredients fresh and high-quality, you set the stage for exceptional Chocolate Peanut Butter Bars.
Tools and Equipment
Making Chocolate Peanut Butter Bars doesn’t require complicated tools, but having the right equipment can streamline the process and ensure professional results. Here’s what you’ll need:
Essential Tools
- Mixing Bowls: Use a medium-sized bowl for the base mixture and a small bowl for melting the chocolate.
- Whisk or Electric Mixer: A whisk works well, but an electric mixer saves time when blending the base.
- Rubber Spatula: This tool is invaluable for scraping down the sides of bowls and spreading layers evenly.
- Baking Pan: An 8×8-inch or 9×9-inch pan works best for this recipe, yielding perfectly portioned bars.
Optional Tools
- Parchment Paper: Lining the pan makes it easy to lift the bars out for slicing.
- Offset Spatula: Ideal for smoothing the chocolate topping.
- Double Boiler: If you prefer not to melt chocolate in the microwave, a double boiler provides even heat.
Investing in these simple tools ensures a smoother preparation process and elevates the overall presentation of your Chocolate Peanut Butter Bars.
Step-by-Step Recipe Guide
Creating Chocolate Peanut Butter Bars is as easy as following a few simple steps. With this guide, you’ll achieve delicious results every time.
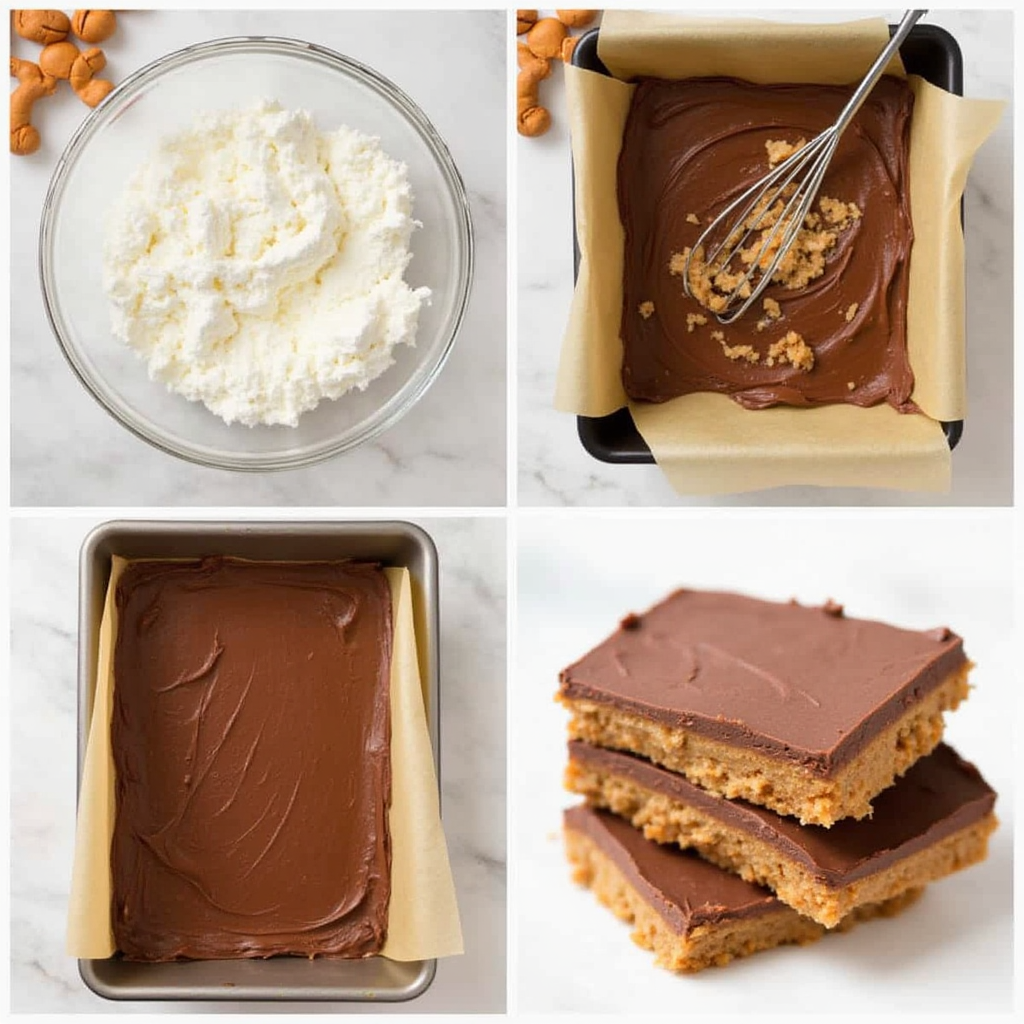
1: Prepare the Base
- In a mixing bowl, combine 1 cup of peanut butter, 1 cup of melted butter, and 2 cups of powdered sugar.
- Stir until the mixture forms a smooth, creamy consistency.
- Gradually fold in 2 cups of graham cracker crumbs, ensuring the mixture is well-blended.
2: Assemble the Base
- Line your baking pan with parchment paper for easy removal.
- Press the base mixture evenly into the pan, using a spatula to create a smooth surface.
3: Create the Chocolate Topping
- Melt 1 cup of semi-sweet or dark chocolate with 2 tablespoons of peanut butter. This can be done in the microwave in 30-second intervals or over a double boiler.
- Stir the melted chocolate mixture until glossy and smooth.
4: Add the Topping
- Pour the melted chocolate over the prepared base.
- Use an offset spatula or the back of a spoon to spread it evenly.
5: Chill and Slice
- Refrigerate the pan for at least 2 hours to allow the bars to set.
- Remove the chilled bars from the pan and cut them into even squares or rectangles.
Following these steps ensures your Chocolate Peanut Butter Bars are perfectly layered and irresistible.
Pro Tips for Perfect Results
Mastering Chocolate Peanut Butter Bars involves attention to detail and a few insider tips.
- Use Room-Temperature Ingredients: Softened butter and peanut butter mix more easily, resulting in a smoother base.
- Chill Between Steps: Letting the base chill briefly before adding the chocolate topping prevents the layers from blending.
- Slice Cleanly: Use a sharp knife dipped in warm water to make precise cuts without cracking the chocolate layer.
Avoid Common Mistakes
- Don’t rush the chilling process; setting the bars properly is crucial for texture.
- Avoid over-melting the chocolate, as it can seize and become grainy.
By keeping these tips in mind, your Chocolate Peanut Butter will look and taste like they came from a professional bakery.
Creative Variations
While the classic recipe is delightful, experimenting with creative twists can make Chocolate Peanut Butter Bars even more exciting.
Flavor Additions
- Salted Caramel Drizzle: Add a layer of caramel between the base and chocolate topping for extra indulgence.
- Espresso Powder: Mix a teaspoon into the base for a subtle coffee flavor.
- Dark Chocolate Chips: Fold these into the base for added texture.
Dietary Adjustments
- Use almond flour instead of graham crackers for a gluten-free version.
- Substitute coconut oil for butter to make the recipe dairy-free.
- Try almond butter or sunflower seed butter for a peanut-free alternative.
Presentation Ideas
- Top the bars with crushed peanuts or sea salt flakes for a decorative touch.
- Use white chocolate to create a marbled effect on the topping.
Experimenting with these variations allows you to customize Chocolate Peanut Butter Bars to suit any occasion or preference.
Storage and Shelf Life
Proper storage ensures your Chocolate Peanut Butter stay fresh and delicious.
Refrigeration
- Store the bars in an airtight container in the refrigerator for up to 7 days.
- Separate layers with parchment paper to prevent sticking.
Freezing
- Wrap individual bars tightly in plastic wrap, then place them in a freezer-safe bag.
- They can be frozen for up to 3 months. Thaw in the refrigerator overnight before serving.
By following these storage tips, you can enjoy your Chocolate Peanut Butter Bars anytime without compromising quality.
Chocolate Peanut Butter Bars: Your Ultimate Guide
Health Considerations
While Chocolate Peanut Butter are undeniably indulgent, it’s important to consider their nutritional impact and explore ways to make them a bit healthier without compromising flavor.
Nutritional Profile
- Caloric Content: These bars are calorie-dense due to the peanut butter, butter, and chocolate. Moderation is key to enjoying them responsibly.
- Sugar Levels: The powdered sugar in the base and the sweetness of the chocolate can contribute to high sugar intake. Opt for lower-sugar ingredients where possible.
- Protein Benefits: Peanut butter provides a good source of protein, making these bars more satisfying compared to many desserts.
Healthier Modifications
- Reduce Sugar: Use unsweetened peanut butter and opt for dark chocolate with a higher cocoa content.
- Incorporate Whole Grains: Replace part of the graham cracker crumbs with oat flour for added fiber.
- Dairy-Free Options: Substitute vegan butter and plant-based chocolate for a dairy-free alternative.
- Portion Control: Cut the bars into smaller servings to enjoy a guilt-free treat.
By making thoughtful adjustments, Chocolate Peanut Butter can fit into a balanced diet while retaining their delicious appeal.
Serving Suggestions
The presentation and pairing of Chocolate Peanut Butter Bars can elevate their appeal, making them the star of any occasion.
Ideal Occasions
- Casual Gatherings: Serve these bars at potlucks or family get-togethers for a crowd-pleasing dessert.
- Festive Celebrations: Add decorative toppings, such as sprinkles or edible gold flakes, to make them festive.
- Gifting: Wrap the bars individually in decorative packaging for a thoughtful homemade gift.
Pairing Ideas
- Beverages: Pair the bars with a glass of milk, a cup of coffee, or even hot chocolate for an indulgent experience.
- Dessert Platters: Combine Chocolate Peanut Butter with other bite-sized desserts like cookies and brownies for variety.
Creative Serving Styles
- Cut the bars into bite-sized squares for a dessert buffet.
- Serve with a dollop of whipped cream or a scoop of vanilla ice cream for extra decadence.
With these serving ideas, you can showcase your Chocolate Peanut Butter Bars in the best light, enhancing their visual and taste appeal.
Frequently Asked Questions (FAQs)
: What kind of peanut butter do you use to make chocolate bars?
For the best results, you should use creamy peanut butter, as it creates a smooth and uniform texture in the bars. However, if you prefer some crunch, crunchy peanut butter works just as well. When choosing peanut butter, make sure it doesn’t have added sugar or excessive oil, as that could alter the consistency. Natural peanut butter is an option, but it often requires extra adjustments to balance its runnier texture.
: What kind of butter do you use to make chocolate bars?
To achieve the perfect richness in your Chocolate Peanut Butter Bars, always choose unsalted butter. This allows you to control the overall saltiness of the recipe. If you need a dairy-free option, plant-based butter substitutes work beautifully as long as they mimic the texture of traditional butter. Melt the butter fully before mixing it with the other ingredients to ensure a cohesive base.
: How do you make no-bake chocolate peanut butter bars?
Making no-bake Chocolate Peanut Butter Bars is quick and simple. First, mix peanut butter, melted butter, powdered sugar, and graham cracker crumbs to form the base. Then, press this mixture into a lined baking pan. Next, melt chocolate with a bit of peanut butter and pour it evenly over the base. Finally, refrigerate the pan for at least 2 hours before slicing the bars. With no baking required, this method saves time and effort while delivering delicious results.
: Are chocolate peanut butter bars vegan?
Chocolate Peanut Butter Bars are not inherently vegan, but you can easily modify the recipe to make them suitable for a plant-based diet. Replace regular butter with vegan butter, and use dairy-free chocolate. Additionally, check that the graham crackers you use are free from honey or other animal-derived ingredients. With these substitutions, you can create vegan-friendly bars without sacrificing flavor.
Conclusion
Chocolate Peanut Butter Bars are a timeless dessert that offers a perfect balance of flavors and textures. From their creamy peanut butter base to the rich chocolate topping, these bars are as satisfying to make as they are to eat.
This comprehensive guide has equipped you with everything you need to master Chocolate Peanut Butter Bars. You’ve learned about ingredient choices, essential tools, step-by-step instructions, and creative variations. Whether you’re making a classic version or putting your own twist on it, this dessert is versatile enough to suit any occasion.
By following health-conscious tips and thoughtful serving suggestions, you can enjoy this treat responsibly while impressing friends and family. Don’t forget to experiment with the creative variations to make the recipe truly your own.
Now it’s your turn to whip up a batch of Chocolate Peanut Butter Bars. Get ready to delight your taste buds and create a dessert that’s sure to be a hit!